AppLovin MAX Adapter
Before You Begin
To integrate the Bidease SDK, you need an active publisher account on the Bidease Monetize platform.
Prerequisites:
- Minimum deployment target: iOS
13.0 - Minimal Xcode version:
16.4 - Minimal AppLovin MAX version:
13
1. Installation
Current published version: 2.2.2.
platform :ios, '13.0'

pod 'BideaseSDK/AdapterAppLovinMax', '2.2.2'
Always use the latest available SDK version from Bidease.
2. Initialization
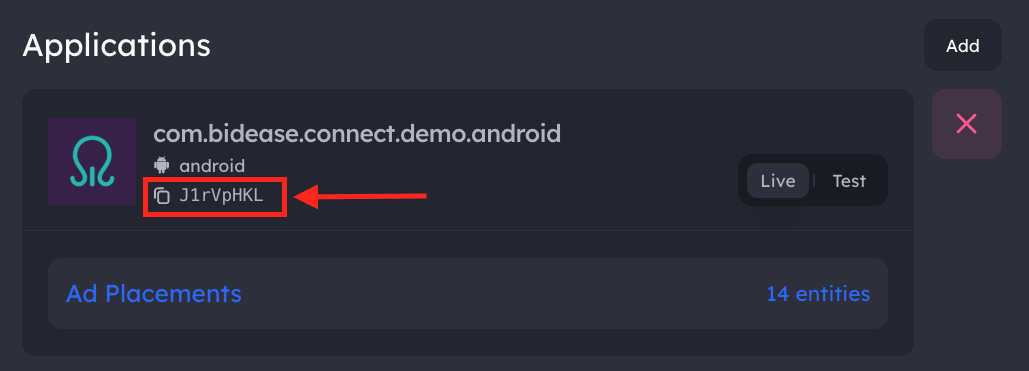
2.1. Getting your App Key
Your App Key is available in the Bidease Monetize dashboard:
- Log in to your account at monetize.bidease.com
- Go to Applications
- Open the required application
- Copy the App Key
2.2. Set Bidease App Key
Before initializing AppLovin MAX, set your Bidease app key:
- Swift
- Objective-C
import BideaseMobileSDK
import BideaseAdapterAppLovin

BideaseAppLovinMediationAdapter.setInitParams(
  InitParams(
      key: "YOUR_APP_KEY",
      privacyParams: PrivacyConfig(/* see Privacy & Consent */),
      customProps: ["ipv4": "203.0.113.17"]
  )
)
In Objective-C, call one of the setInitParamsWithKey: overloads — the setInitParams: form that takes an InitParams object is not exported to Objective-C.
#import <BideaseAdapterAppLovin/BideaseAdapterAppLovin-Swift.h>

// Minimal — app key only
[BideaseAppLovinMediationAdapter setInitParamsWithKey:@"YOUR_APP_KEY"];

// App key + custom props
[BideaseAppLovinMediationAdapter setInitParamsWithKey:@"YOUR_APP_KEY"
  customProps:@{ @"ipv4": @"203.0.113.17" }];

// Full privacy + custom props
[BideaseAppLovinMediationAdapter setInitParamsWithKey:@"YOUR_APP_KEY"
  coppaEnabled:NO
  subjectToGdpr:@YES
  subjectToCoppa:@NO
  usPrivacyString:@"1YNN"
  gppString:nil
  gppSid:@[ @2, @6 ]
  userConsentString:@"consent-string"
  subjectToLgpd:@NO
  customProps:@{ @"ipv4": @"203.0.113.17" }];
YOUR_APP_KEY with the App Key from your Bidease Monetize dashboard.Only the app key is required. In Swift use BideaseAppLovinMediationAdapter.setInitParams(InitParams(key: "YOUR_APP_KEY")); in Objective-C use [BideaseAppLovinMediationAdapter setInitParamsWithKey:@"YOUR_APP_KEY"].
3. Configure Bidease in AppLovin MAX Dashboard
Before configuring AppLovin MAX, ensure your app and placements are registered in the Bidease Monetize dashboard. Set up your placements →
3.1. Add Bidease as a Custom Network
- In your AppLovin dashboard, go to MAX → Mediation → Manage → Networks
- Scroll to the bottom and click Click here to add a Custom Network
- Fill in the following fields:
| Field | Value |
|---|---|
| Network Type | SDK |
| Name | Bidease |
| iOS Adapter Class Name | BideaseAppLovinMediationAdapter |
- Click Save
3.2. Enable Bidease on Your Ad Units
- Go to MAX → Mediation → Manage → Ad Units
- Select the ad unit where you want to enable Bidease
- Find Bidease in the custom networks list and enable it
- Enter the placement details:
| Field | Value |
|---|---|
| App ID | Your Bidease app key |
| Placement ID | AdFormat_ecpm_X.X — e.g., Interstitial_ecpm_1.3, Banner_ecpm_0.5 |
| CPM Price | Enter the same floor price value as in your Placement ID (the X.X value) |
- Click Save
Allow 30–60 minutes for changes to take effect.
4. Privacy & Consent
Privacy signals and custom props are passed to the Bidease SDK via InitParams at initialization. Set them when you initialize the SDK, or update them at runtime via BideaseMobile.setPrivacyParams(...) / setCustomProps(...).
Not for child-directed traffic. Bidease does not purchase or monetize traffic from applications directed to children or to individuals under the age of 13. Publishers are solely responsible for identifying child-directed inventory under COPPA and other applicable laws and must not integrate the Bidease SDK into, or send any traffic or personal data from, such inventory.
import BideaseMobileSDK

let privacyParams = PrivacyConfig(
    coppaEnabled: false,
    subjectToGdpr: true,
    subjectToCoppa: false,
    usPrivacyString: "1YNN",
    gppString: "DBACNYA~CPXxRfAPXxRfAAfKABENB-CgAAAAAAAAAAYgAAAAAAAA~1YNN",
    gppSid: [2, 6],
    userConsentString: "CPXxRfAPXxRfAAfKABENB-CgAAAAAAAAAAYgAAAAAAAA",
    subjectToLgpd: true
)
| Field | Type | Description |
|---|---|---|
coppaEnabled | Bool? | Enable COPPA compliance |
subjectToGdpr | Bool? | Subject to GDPR |
subjectToCoppa | Bool? | Subject to COPPA |
usPrivacyString | String? | IAB US Privacy string (e.g. "1YNN") |
gppString | String? | IAB GPP consent string |
gppSid | [Int]? | GPP section IDs |
userConsentString | String? | IAB TCF consent string |
subjectToLgpd | Bool? | Subject to Brazilian LGPD |
5. SKAdNetwork IDs
The Bidease SDK supports SKAdNetwork so partner networks can attribute installs when IDFA is unavailable. Add the SKAdNetworkItems entry to your Info.plist:
- In Xcode, select Info.plist in the Project navigator.
- Right-click Info.plist → Open As → Source Code.
- Copy the SKAdNetworkItems array from the file below and paste it into your Info.plist.
6. Test Mode
Option 1: Enable via Code
pod 'BideaseSDK/AdapterAppLovinMax', '2.2.2'
pod 'BideaseSDK/TestMode', '2.2.2'
Option 2: Enable via Dashboard
- Go to Applications and open the required app
- Navigate to Test Devices and add the devices you want to test on — use IDFA (iOS)
- Enable Test for the application
7. QA Checklist
- Test Mode provides nearly 100% fill — expected behavior for QA only.
- Disable Test Mode before submitting your app to the App Store.
- Ensure IDFA tracking is enabled on your test device so the Bidease team can review logs.
- If you run into any issues, contact your Bidease account manager.